
How to Start a Photography Business and Make Money
.webp)
Has someone ever looked at your photos and said, you should charge for this? That's usually how the idea starts. People need photos for many occasions and they're ready to pay good money for quality work. So why not turn this into a business?
You don't need a huge studio or the expensive gear on day one. You can actually start this business small and grow from there.
This guide shows you exactly how to start a photography business from scratch in a simple way. No confusing talk. Simple practical steps you can follow.
Key Takeaways
- Learn what a photography business does and how you make money from it.
- Get a complete guide to start your business from scratch.
- know how to choose a niche, buy the right gear, price your work, and attract clients.
- Skip the mistakes that slow down most beginners.
What Does a Photography Business Do?
A photography business is pretty straightforward. You take photos for people or businesses and they pay you for it. But honestly, there's more work to it than just snapping pictures.
You might shoot family portraits one day, cover a wedding the next, or take product photos for someone selling stuff online. Real estate agents need photos of homes. Local businesses want headshots. The work varies a lot.
And here's the thing. The real work starts after you finish shooting. You gotta edit the photos, organize everything, send files to your clients, answer their emails, and keep track of your bookings, etc.
The camera is important for sure. But what you're doing is running a service business. People pay you for great photos and a hassle-free experience.
Types of Photography Businesses You Can Start
There are many directions you can go with photography. You don't need to do everything.
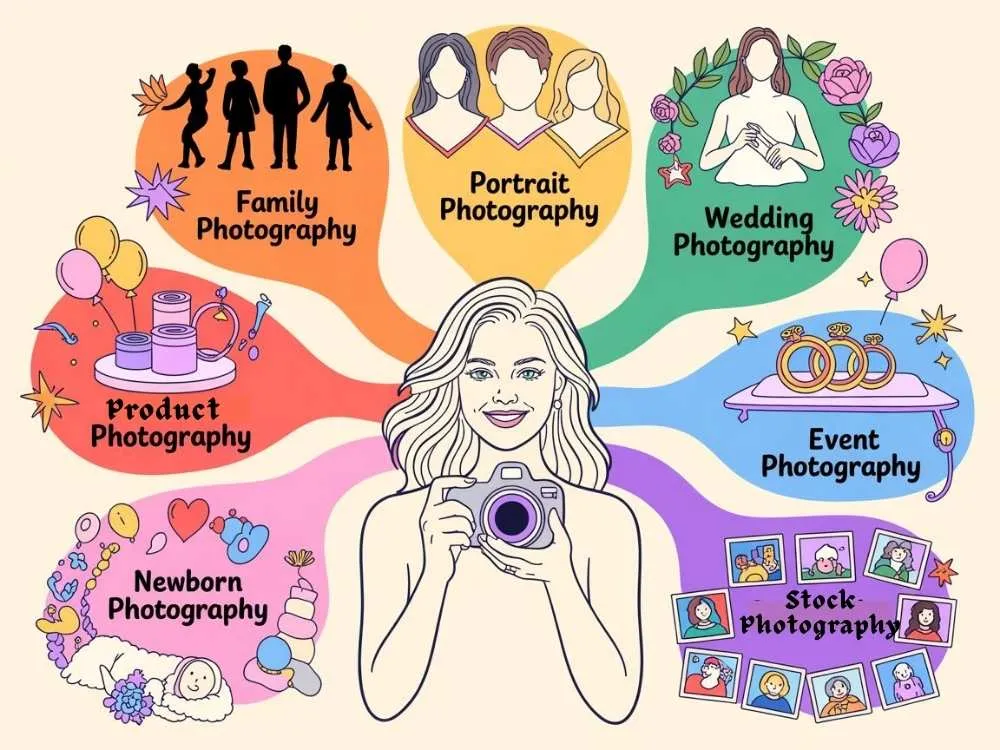
Some common types include:
- Portrait photography like headshots and personal branding shoots
- Family photography such as capturing families and kids at the park
- Wedding photography, which pays well but demands a lot from you
- Event photography like birthday parties, corporate events, work anniversaries or conferences
- Real estate photography such as shooting homes and commercial properties
- Product photography where you help online sellers showcase their products
- Food photography for restaurants and food brands
- Newborn photography with those tiny baby photos parents love
- Stock photography where you take photos once and sell them repeatedly
Some photographers stick to one niche. Others offer a few services at first and narrow them down later. That part can change as you gain experience.
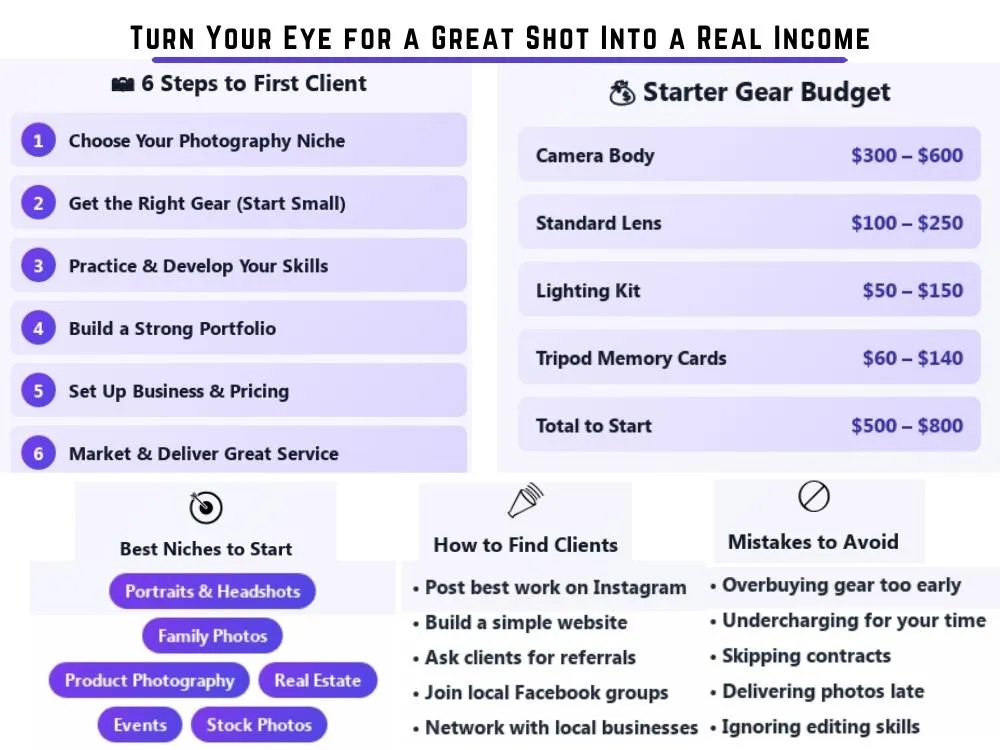
Step 1: Choose Your Photography Niche
A niche definitely helps you improve focus. It also makes things easier to explain what you do when someone asks. If you notice, wedding photography is completely different from product photography.
One has you chasing emotional moments with fast-moving people. The other has you in a controlled setting, adjusting lights and angles until everything looks perfect.
When choosing your niche, think about:
- What type of photography you enjoy most
- What people in your area actually need
- What fits your personality and schedule
- What kind of shoots you feel comfortable doing
Portraits or small events are usually easier to break into when you're just starting. They don't require experience upfront. You can always shift direction later once you figure out what works for you.
Step 2: Get the Right Equipment
Some people say that you need expensive gadgets. That's one of the biggest myths in photography. Good equipment helps, sure. But your skills and eye for a good shot matter way more in the beginning.
Start with what you can afford. Upgrade later when your business starts bringing in actual money. Here's what you'll actually need and what it costs
| Equipment | Starting Out | Mid-Level | High-End |
|---|---|---|---|
| Camera body | $300-$600 | $1,000-$2,000 | $2,500-$5,000 |
| Standard lens | $100-$250 | $500-$1,200 | $1,500-$3,000 |
| Lighting kit | $50-$150 | $300-$800 | $1,000+ |
| Tripod | $30-$80 | $150-$300 | $400+ |
| Memory cards and storage | $30-$60 | $100-$200 | $300+ |
| Editing software | Free or $10/month | $10-$30/month | $10-$30/month |
A basic starter setup looks like this:
- A decent used or entry-level camera body
- One good lens (kit lens works fine)
- Extra batteries
- A few memory cards
- A sturdy tripod
- Free editing software like GIMP or affordable options like Lightroom
You can honestly start with $500-$800 total for most types of photography. Buy used gear when possible. It saves a ton of money.
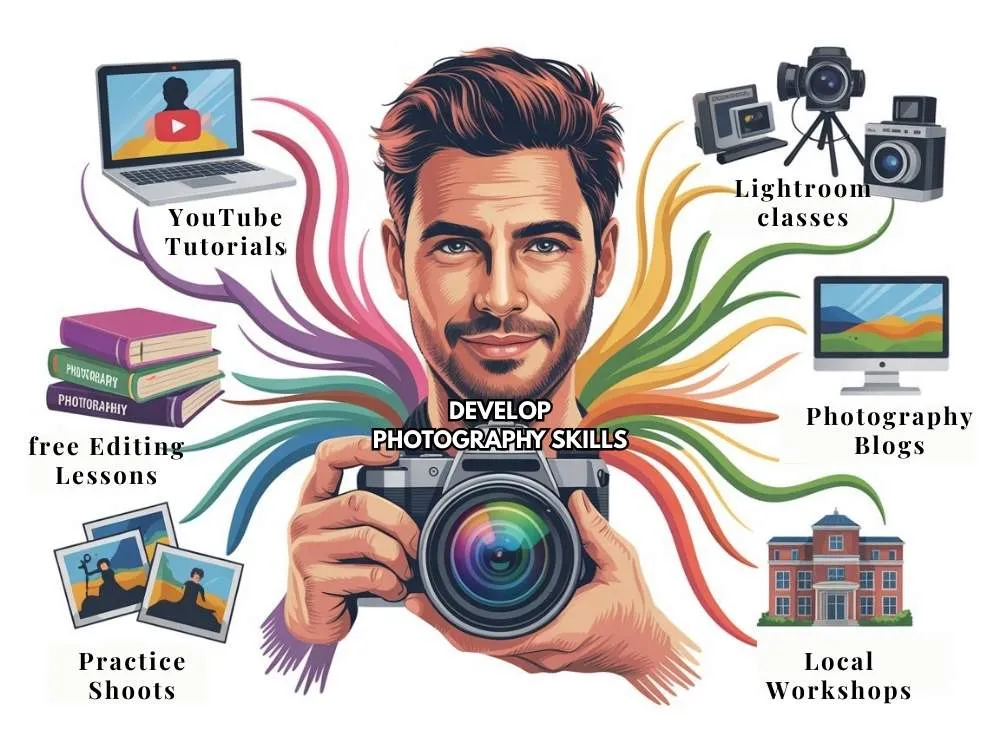
Step 3: Develop Your Photography Skills
This step is important. Skills matter where you really need to understand lighting, composition, camera settings, and editing.
A) Self-Teaching and Practice
If you just look around, a lot of photographers are self-taught. That path works if you stay consistent.
You can learn through:
- YouTube tutorials
- Photography blogs
- Practice shoots
- Free editing lessons
- Trial and error
The biggest thing is practice. Go out and shoot often. Try different lighting situations and subjects. Shoot outside, inside, people, products, whatever you can find.
Each session teaches you something new. Take photos and review them. Figure out what looks off and do it again. That's how most people improve.
B) Formal Education and Courses
Some people prefer structure. Nothing wrong with that.
You can take:
- Online photography courses
- Lightroom or Photoshop classes
- Local workshops
- Community college classes
Taking courses helps you save a lot of time and avoid beginner mistakes. Many photographers even create and sell online courses about their techniques and workflows.
You can buy these and learn directly from people already running successful photography businesses.
Step 4: Build Your Portfolio
Before people hire you, they wanna see your work. That's where your portfolio comes in. You don’t need a huge portfolio, but a strong one helps. A small collection of your best photos works better than uploading everything you've ever taken.
You can build your portfolio by:
- Taking photos of friends or family
- Offering a few free or low-cost sessions
- Photographing local products for small businesses
- Practicing styled shoots
It shows the kind of work you want. Aiming for weddings? Put in shots of couples and engagement. Display your best product images if you prefer product photography. Simple as that.
Moreover, keep your work original. A reverse image search tool helps you see if anyone's stealing or copying your photos online.
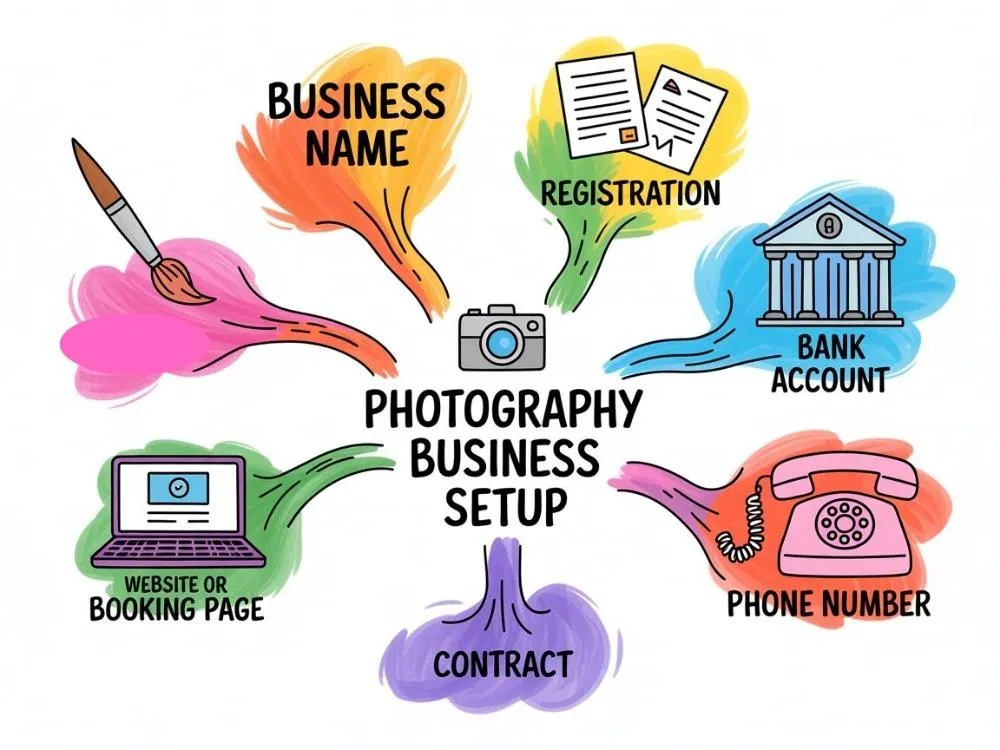
Step 5: Set Up Your Photography Business
Set things up properly once you are ready to start charging.
Basic things to sort out:
- Choose a business name
- Check local registration requirements
- Open a separate business bank account
- Create a simple contract
- Set up a website or booking page
- Make a business phone number or email address
You don’t need a complicated setup. You just need to look professional and stay organized. Also, keep your personal money and business money separate from the start to avoid a mess later.
Step 6: Price Your Photography Services
This part makes a lot of beginners nervous. Most people undercharge at first because they're afraid of scaring clients away.
But here's the thing. Your price needs to cover way more than just the actual shoot. You're also charging for:
- Planning and prep time
- Travel time to and from the location
- Editing time after the shoot
- Equipment wear and costs
- Software subscriptions
- General business expenses
Common ways to price your work:
- Hourly rates usually for smaller projects
- Session packages for portraits, families, or seniors
- Event packages include weddings, parties, corporate events, etc.
- Per-image pricing that’s mainly for commercial and product work
Look at what exactly photographers in your area charge without copying blindly. Your pricing should match your skill level and the type of work you offer. Start fair. Then raise your rates as your work improves and demand grows.
Step 7: Market Your Photography Business and Find Clients
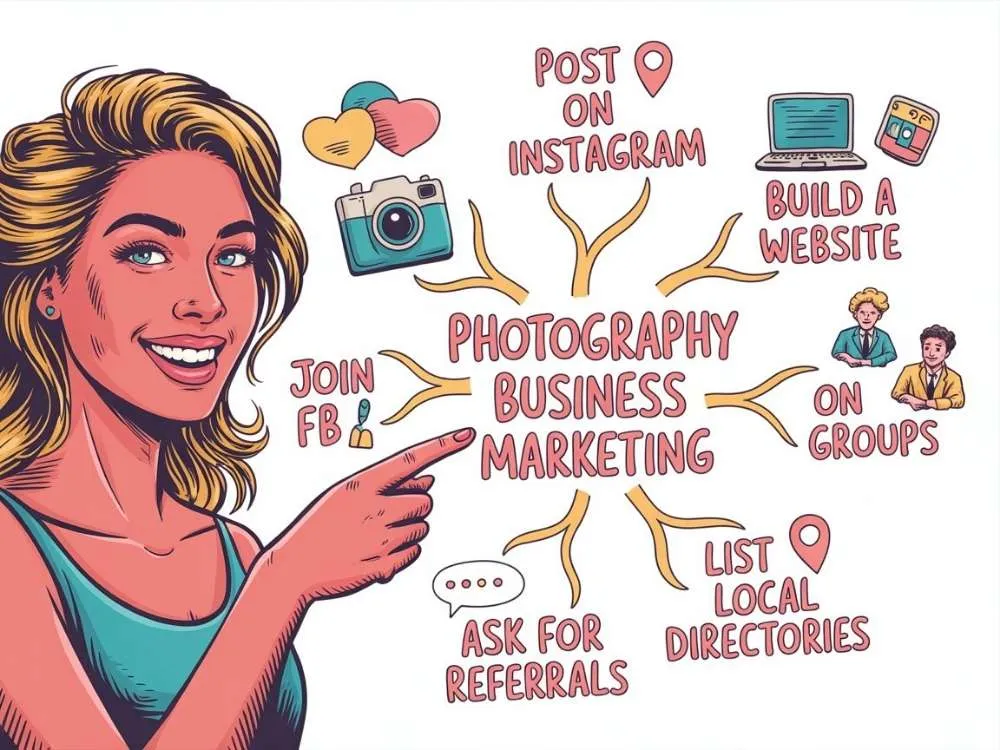
Talent alone won't get you clients. No one knows you exist without you doing marketing. That's why this step is so important.
Simple ways to find clients include:
- Posting your best work on Instagram
- Building a simple website
- Asking past clients for referrals
- Joining local Facebook groups
- Networking with local businesses
- Listing your services on local directories
Word of mouth helps a lot in photography. Once you do a few shoots well, people start recommending you. Try to stay visible. Post consistently. Reply to messages on time. Let people know what kind of photography you offer.
Step 8: Deliver Professional Service
Clients walk away if you deliver poor service. Treat them better with quality services to get repeat projects and referrals.
Clients usually remember things like:
- Did you reply quickly?
- Did you show up on time?
- Did you explain the process clearly?
- Did you deliver the photos when you promised?
Professional service means clear communication and realistic timelines. A good attitude also counts, where even when a shoot gets chaotic or stressful, clients want someone who stays calm and handles things smoothly.
When you deliver the final photos, make it easy for them. Use a well-organized folder or a simple download link. Don't make them hunt for their images or figure out complicated systems.
Step 9: Scale and Grow Your Business
You can grow in different ways once you start getting regular bookings.
Some photographers grow by:
- Raising their prices
- Offering new services
- Selling albums or prints
- Hiring an assistant
- Working with second shooters
- Specializing in one niche
You don't need to rush this part. Build slowly. Get good at the basics first. Growth becomes
Common Photography Business Mistakes to Avoid
A lot of new photographers make the same mistakes. Catching them early helps avoid issues later. Some common ones include:
- Buying too much gear too soon
- Charging too little
- Taking every type of job and getting scattered
- Not using contracts
- Ignoring editing skills
- Relying only on social media
- Delivering work late
- Communicating poorly with clients
One big mistake is thinking photography is only about taking photos. It's not. You are running a business. That means organization, pricing, communication, and perseverance all matter.
Wrapping Up
Starting a photography business is simpler than you think. You can actually make a good income if you're serious about this business. Start with the skills you have and build a solid portfolio. Keep improving your work and treat your clients better. This way, your photography business can grow from a side skill into a real source of income.
FAQs
Q1: How much do I need to start a photography business?
You can start this simply with $500-$800. Buy used equipment first. Then upgrade later when clients start paying you.
Q2: How long does it take to make money?
It actually varies. Some photographers get their first paying client in a few weeks. Some may take months. Build your portfolio and stay active to make it quick.
Explore Related Posts
https://smarttoolsai.com/post/how-to-start-a-graphic-design-business
https://smarttoolsai.com/post/how-to-start-a-print-on-demand-business
https://smarttoolsai.com/post/how-to-start-a-bookkeeping-business